Daily Make Up Routine (Updated)

Ok, when I say “Daily Make Up Routine” I slightly lie. I definitely do not do this every day. I am lucky to be able to work from home 2-3 days a week depending on the week. But when I do go into work, this is my go-to look. When I am working from home, I brush my teeth, wash my face, put on lotion and done! =) I would do a blog on that… but you just read it. That was it!

Be warned that there’s are quite a bit of steps involved to put on my face in the morning. I mean give me a break… if I want to look like I got some sleep, I gotta spend a little bit of time to uh, as the makeup community calls it, “beat mah face.” Since this is my go-to look, I can do this in 15-17 minutes tops ;-).  That’s the fastest I can do it. Motherhood does not allow me more time most of the time because the kiddos always seem to know when I get up because they promptly call for me as I finish up “the look.”

Daily Make Up Routine

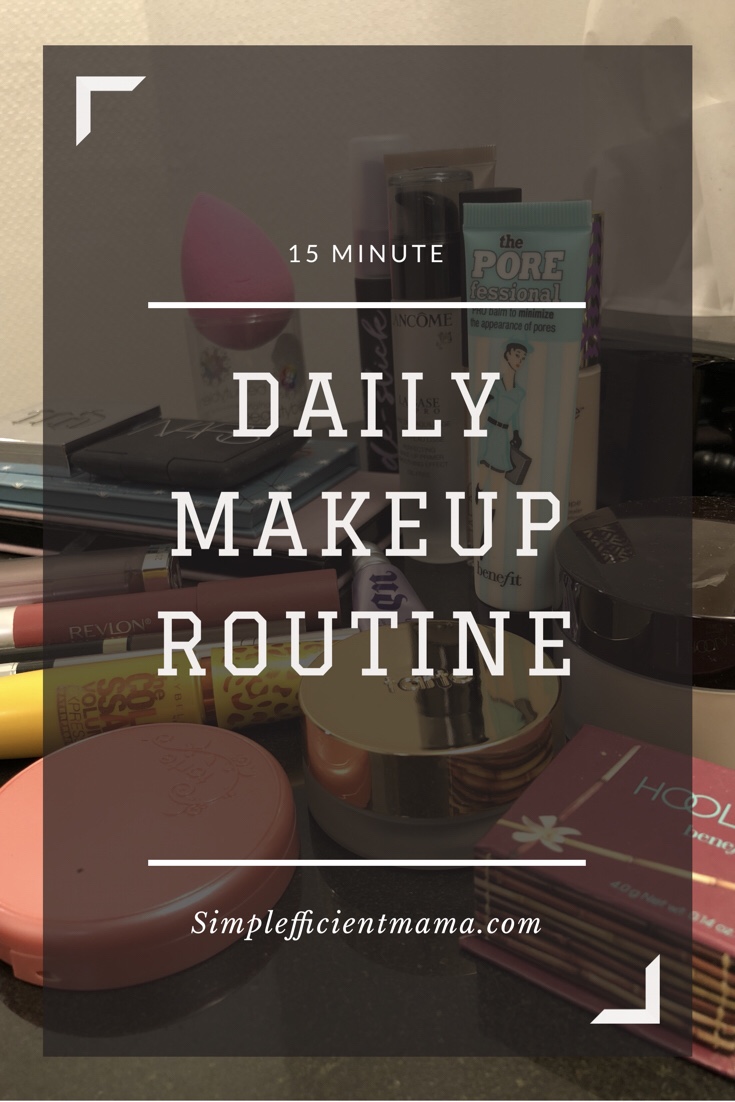
Disclaimer: I’m not affiliated with any of the products I mention. I bought all of them with my own money because well… I’m not a big shot make up guru. I wish I were sometimes… then I see the real makeup gurus and I’m like “ohhhh it’s cuz I can’t do makeup like they do. Got it…” 

Ok, so always start with a clean face. Then I put some lotion on my face because one, it’s good for your face, and two, so my makeup won’t look cakey.  Here’s my face without make up, so fresh, so clean, all moisturized and all…

img_3023

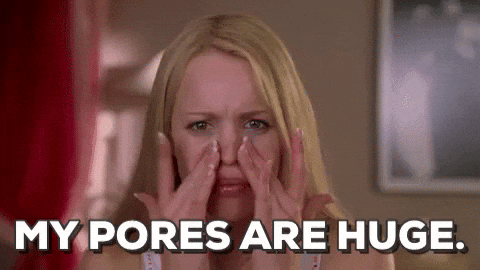
The first thing I do is put primer on. I use Lancome’s La Base Pro all over my face. Then I use Benefit’s Porefessional on the area around my nose, and my cheeks because giiiirrrllll, pores. Lately, like after 33 or something, my pores are like craters. So the primer helps make my face a little smoother. Trust me. It works.

I don’t really use foundation. Mainly because I do not have time to find my real shade plus I don’t really know how to find my real shade since my face is not the same color man. Like which part of my face do I match the shade to? I don’t know! So I use a tinted moisturizer =). It’s more forgiving even if you don’t get the exact shade because it’s not full coverage which means your face will still show through. I currently use Bare Minerals Tinted Moisturizer in “Natural 05” but I feel like it makes me look slightly yellow so I’m on a hunt for a different tinted moisturizer.

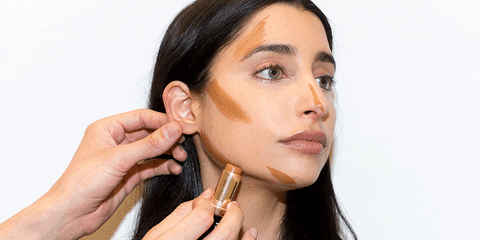
Ok! Still with me??? I put that all over my face and blend with the Beauty Blender. Then I take the Tarte Shape Tape (in Light Sand) where I need more coverage (as shown below – uhh still kind of all over my face… ha). Then I use the Beauty Blender to uhh blend it out and then I look pale as a ghost! Trust the process people… I then use Laura Mercier’s setting powder and use it to “set” under the eye to make sure the concealer doesn’t crease and make me wrinklier. Is that a word? eh…

To bring color back to my face, I use Benefit’s Hoola Bronzer to contour my face and nose and Tarte’s Amazonian Clay Blush to make my cheeks look alive. I use the bronzer and contour around my face and my cheeks. I start by my ears and down underneath my cheekbones. Then I use it on the sides of my forehead and on my jawline.  I also use to contour on the sides of my nose to make it look I have a nose. The blush will go right on the apple of my cheeks.

The next step is attacking my brows. I only started doing this this year. Brows apparently shape your face so I’ve been trying it for a couple of months. I use the L’Oréal Brow stylist. Following the shape of my brows, I line my brows with small strokes and then use the spooly to blend it out. I don’t really try to reshape my brows. I do not know how! So I just follow the natural shape of my brows :).

After that, the eyes.  With my fluffy eyeshadow brush I take some of the Hoola bronzer and put it all over my crease. Then I take Colourpop’s Semi Precious eyeshadow palette and use the shade  “celestial” and put it all over my lids with a flat shader brush. After that I take my fluffy eyeshadow brush again and blend out the edges. I then take a smaller eyeshadow brush and line my bottom lash line and highlight the inner corner of my eye with the same color as the lid and I also line the bottom lash line as well.

To finish the eye look, I use Emcosmetic’s Brush Tip Illustrative eyeliner and line just my top lid. Lastly, if I have time, I’ll take a highlighter brush and use Urban Decay’s Afterglow Highlighter and highlight above my cheekbones and slightly above my brows to give me an awake, dewy look. I like this highlighter because it’s subtle and not too in your face. Then for the lips, I use Revlon’s Matte Lip Balm in some mauvy color to finish off the whole look. To make my makeup last all day, I use Urban Decay’s All Nighter setting spray and spray it in a “T” and “X” motions across my face. That’s it! Done! Finito!

If I ever wake up early enough (once every 4 months or so ;-)), I’ll curl my hair and voila! Like a totally different person!

That’s it! Hope you enjoyed this step by step makeup routine! It’s a long one! But I promise it takes me 15 minutes (without the hair part) probably because I do it every day with the same colors and same exact steps. But even if it takes longer, I still would probably do this because it’s something for myself. For me, when my “face is on”, I feel a little more confident and prepared for the day because I took that extra time to myself to start my day.

What do you do to make yourself feel ready for your day?

Thanks for reading and have a great rest of the day!!

(all gifs are from giphy.com)

Homemade Pho Pressure Cooker Recipe

 Disclaimer: My husband and I are not Vietnamese. BUT we both have a love for…PHO! I mean who doesn’t love pho?! The soft rice noodles, the thinly sliced beef (or if you like the more “exotic” parts of the cow – like tripe, etc),  and the unmistakable unique taste of the broth whose flavor came from simmering beef bones and other awesome spices overnight – or in our case, a couple hours in the pressure cooker.

Ok! So a couple people have requested that my husband, Andrew, make an appearance on the blog. So, he decided he would contribute by writing up a recipe for pho. So, another disclaimer, this is not my recipe. Andrew decided to make his blogging debut by giving me step by step instructions on how he made pho. Not exactly a “dad blog,” but the man does not like to talk about personal stuff… so this is what you get. Something about food! The man loves his food! If he could do anything in the world without repercussions, he would play basketball and eat different types of food from all over the world. That’s the man I married. Basketball and food is life to him. (Ok, fine, maybe the children and I are first, but like basketball and food… very close 2nd and 3rd)

Before Andrew took on this task, he talked to his friend, who is Vietnamese and who also had already made him Pho before. He also read 4 different recipes and took bits and pieces of each recipe to create his own version. He couldn’t remember all the links to the recipes he looked at, but here’s one of them just in case you wanted to know a source.

OK! So without further ado, here’s Andrew! (With some commentary from me which will be in italics)

Ingredients:

  • Beef Knuckle Bones/Beef Shank/Oxtail – the amount here doesn’t matter too much because this is is what you’re going to use to flavor the broth, so go big on it!
  • Water – again, the amount here, you will be eyeing
  • 1 medium onion
  • 1 piece of ginger
  • 1-2 sticks of cinnamon
  • 5 star anise
  • 7-10 pieces of cloves
  • daikon (peeled and halved)
  • 1/3 cup brown sugar – more to taste at the end
  • ½ cup fish sauce – more to taste at the end
  • 2 tbsp salt – more to taste at the end
  • Bean sprouts
  • Green onions (for garnish)
  • Thai basil (for garnish)
  • Jalopeno peppers (optional)
  1. Soak and wash the beef bones, beef shank or oxtail for about 20 minutes in a regular pot. Then take it out of the pot.
  2. Parboil for 10 minutes – boil enough water that would cover the all the bones, put in bones when boiling, then rinse in cold water. Look at him using technical terms such as “parboil”! Which, by the way, means partially cook… shouldn’t the word be “parcook” then? No? Just me? OK! Moving on…
    img_2951-1
  3. Add oil on a separate pan. Once hot, add onion, a whole ginger (cut in half). Cook, without stirring, for about 4 minutes, until slightly charred.
  4. Add 1-2 cinnamon sticks, 5 star anise and 7-10 cloves and cook for 3 minutes longer, until fragrant. (Some recipes say to crush them up and wrap in cheese cloth or tea bag so it’s easier to scoop out).
     

  5. Time to put everything from steps 3 and 4 in the pressure cooker!
  6. Add the beef bones, daikon (peeled and halved), 1/3 cup brown sugar, ½ cup fish sauce, 2 tbsp salt to the pressure cooker. (For the quicker version, you could also just buy the Beef pho soup base (Vietnamese msg) and add about 8 tbsp or more to taste and the pho pasteur spice bag so you don’t have to buy all the individual spices.) Look at him thinking things through for you guys! For the record, he did buy the base but decided against it because he wanted his first try to be all “fresh” ingredients.
    img_2953-1
  7. Add the hot water from the parboil step to max cup line; set manual high pressure for 60 minutes, then 15 minutes natural pressure release.
  8. Slowly release pressure by turning knob to venting.
  9. Pull out bones and scoop out onion, anise, cinnamon and cloves. What you get is a concentrated version of the soup base. You don’t have to use all the broth. In fact, go ahead and put half of that in the freezer and use it on a rainy day!
     

  10. Then fill back to max line with water and turn on saute to bring to a boil. Season to taste with additional salt, fish sauce and sugar.
  11. You can throw meatballs in for about 5 minutes and any other thinly sliced meat if you want it cooked well
  12. Assemble your pho bowl and put in the following: Noodles, bean sprouts, meat (raw and/or cooked) – the raw meat should be thinly sliced so that the hot broth can effectively cook itimg_2838-1
  1. Pour the hot broth onto assembled bowl
  2. Garnish with cilantro, green onions, Thai basil and jalapeno.
     

Some tips:

  • If you do end up saving half the concentrated pho broth, place it in fridge first, then you can scoop out the fat layer before freezing it to keep it fresh for about a week
  • If you buy fresh pho noodles, just bring water to boil and then put the noodles in for about 10 seconds and then scoop it out
  • If you buy dried noodles, you will need to soak it in hot water for about 10 minutes until softened and then put in boiling water for about 10 seconds and blanch it.

So there it is folks! Andrew’s pho recipe. I hope you enjoyed his appearance here on simplefficientmama.com! Make sure you hit that subsrcibe button for more fun recipes, product reviews, and lifestyle musings!

Thanks for reading and have an awesome day!

6 Tips That Helped Us with Sleep Training

Tired moms and dads out there have their work cut out for them trying to find anything on sleep training their babies. There are so many methods out there now and some of them contradict each other that you just never know which one to follow! I am by no means an expert on sleep training, but I now have 2 kids (ages 4 and 19 months) that sleep 10-12 hours at night so I thought maybe I can share with you my experiences in hopes that it would maybe help you.

Please remember that every kid is different and that you’re the expert when it comes to your own child. Here are some sites that may help you if you would like to do further research (I am not affiliated with any of these sites, I just found them helpful when I was perusing before I decided to write this):

  1. The Bump
  2. Baby Center
  3. Parent

Every Kid is Different!


Here are my two lovely little boogers. They are the joys of my life… most of the time. Just keepin’ it real. Sometimes they can be a real pain especially when they decide to throw tantrums at the same time! But I digress… this is about sleep training after all.

Although controversial, I did the Cry It Out Method with both of them. Very different experiences from two very different kiddos. We started the CIO method with Ella at 8 months and the first night was a nightmare. She cried and whined on and off (not straight through I promise) for 40 minutes before she fell asleep. We started with Isaac at 6 months because he was sleeping long stretches already. He whined for 15 minutes and then fell asleep.

Ella doesn’t like to sleep. She doesn’t nap at home but will nap in daycare for some reason. She would always “fight” it when it’s time for bed. After the 1st week of the CIO method, she would no longer cry but she would play and roll around in her crib until she finally went to sleep. She still does that now. She’ll look at books, roll around, and play with her stuffed animals before finally sleeping.

Isaac seems to like sleep. He’s a great napper in the afternoon. We’ll put him down in his crib, and most of the time he won’t cry and just go straight to napping. Sometimes, he will cry 10-15 minutes, and then nap. At night, he will stand up and walk around in his crib, yell for Ella (if she’s not in the room), and then sleep. Unless he poops, then he’ll bang on the edge of the crib and that’s when we know the little man needs his diaper changed. I don’t know how that happened. Technically, he trained us to come when he bangs on the crib ;-).

Anyway, both of them seem to be doing well. At least it doesn’t seem like they hate us for leaving them in their beds while still awake. They do share a room now. Once Isaac slept through the night, we put them in the same room. It seems to work well for them because they seem to still like each other. We open the door to two smiling little ones in the morning unless Ella runs into our room first yelling “IT’S WAKE UP TIME!!!”

6 Tips for Sleep Training

Desperate for sleep when I was a first time mom, I did some research online for tips on sleep training. There are a lot out there! Here are what I found most useful for our family.

  1. Schedule: I read early on that having a good sleep schedule helps kids go to bed. So even before we tried the CIO method, I was already so anal about scheduling naps and sleep time for both kids. Since I worked full time, their day care actually helped put them on a good nap schedule. From 0-3 months, I read that they should really not be awake longer than 2-3 hours. So once they woke up at 7 am, I put them down for a nap at 9am. Earlier on, they would have longer naps in the morning (9-11am). Then awake from 11am -2pm. Then nap from 2pm to 3 pm or 4 pm. Then awake for 2-3 hours, and then we start their bed time routine. Later on, the morning naps decreased and the afternoon naps increased. Either way, there was a 2-3 hour period of wakefulness in between the naps and sleep times. It seemed to work for both kids.
  2. Bed time routine: I read that this helps cue the babies that it’s time to sleep. So we would bathe them, put on jammies, pray with them, read 1-2 short books, turn the lights off, sing a couple of songs, then put them in their beds and stay with them for 5 minutes (longer when sleep training them, we pretty much stayed with them until they were drowsy), then leave the room. We only came back in if anyone cries hysterically. Ella seems to have nightmares once in a while. That’s when we would come in and soothe her.
  3. Setting up the environment: Dimming the lights, and turning on the white noise. We never did the white noise for Ella because we just didn’t know. But it worked like a charm for Isaac. White noise machines are like magic, man. Since they share the same room now, Ella also seems to like it. It also helps drown outside noises and since they sleep pretty early (7:30ish), there’s still a lot of noise outside sometimes.
  4. Wubanubs Pacifiers: This is genius really. I mean only if your baby likes pacifiers. But these pacifiers are attached to very small stuffed animals which makes it easier for them to grab as a baby. Or easy for you to find if you decide to go in and give them the paci. Of course, this would only work if your baby likes pacifiers.
  5. OK to Wake Alarm Clock: When Ella was old enough to get a big girl bed (around 3 years old), she would sometimes wake up at 4 am to pee and think it’s morning time. She would then come into our room and yell “IT’S WAKE UP TIME!” So I read about this clock where you can set it to change the color of the light to let your child know when it’s time to wake up. Ella seemed to like it and would go back to bed until the yellow night light turned green. Then she would run to our room and yell “IT’S WAKE UP TIME!!” 
  6. Stop Comparing: If you’re not gonna read anything else in this page, this is the one thing I would like to tell you. Stop comparing yourself to other parents. Everyone has different stories. You’re going to drive yourself crazy if you compare yourself to other parents. Who knows? They’re probably lying anyway and is also as sleep deprived as you are. Just kidding. Maybe. Ha! But for real, you do what you need to do to get sleep for you and your baby (babies).

That’s all I got. You can read about the different methods in one of the links above. There are tons you can choose from. Choose what works best for you and your family. Try them all if you must. In the meantime, take a deep breath, you’re doing just fine and if things are really hard right now, know that it will get better. You can do this!

Thanks for reading and have a great rest of the day!


(all gifs are from giphy.com)

Mac & Mia Review

Shopping for kids clothing can be a bit overwhelming for me. It’s hard to bring Ella and Isaac to the store and have them try on stuff because by the time we pick out their clothes, they don’t necessarily want to try them on. When we do make the trek to the store to find them outfits, I want to buy everything and they don’t want to try on anything! Does that happen to you guys? No? Just us? Enter Mac & Mia – children’s boutique clothing right at your door!

About Mac & Mia

Ok, so I figure I should tell you a little bit about what this service is before I go into my experience. Mac & Mia is basically a clothing service to find awesome outfits for your child without you having to go to the store. Once you get to the site, you will be asked a couple of questions about your child’s size, preferred style, etc. so that your stylist (that’s right people, you get your own stylist ;-)), will have something to go on when they pick out pieces for your order. This is like the kid’s version of Stitch Fix.

How much is it? Every time you request a box,  you pay a $20 styling fee. If you buy 2 or more items from the box, the $20 fee will be applied to your total order every time you order! AND get this, for your FIRST order, they give you a $20 credit… so if you buy 2 or more items, you’re essentially going to get $40 off! I’m just saying, that’s worth it if you think about it ;-).

Why I Like Mac & Mia (Pros)

The Deal: Y’all! I’m from the Philippines and Filipina Mamas LOVE great deals! When I heard about the $20 sign up credit and the $20 styling fee being waived (if you buy 2 or more items), I was like “I’m rich! I got $40! I quit everything!!” 😉 Just kidding on the quitting. Don’t lie, you know you got a little excited after reading that too ;-).

Your Own Stylist: Ok, so I may not have the best sense of fashion. We are lucky that we have friends and family who will steer us the right way when it comes to the kids clothing. So having their own stylist is a good thing for me ok!? It also sounds cool like, “oh Ella’s stylist thought this dress would look great on her.” Ha! What’s also nice about it is that you can try on different styles that you may not have thought of trying in the first place.

img_2789

High Quality Materials: All the pieces that I received in my first box felt very well made. Ella is rough on her clothing. She may be a girly girl because she loves dresses, and bows and stuff, but girl is not afraid to get down and dirty (and we love that about her!). So this is nice because we know that it will hold up when she’s being cray ok?

No shopping: Yes, sometimes I like picking their outfits. But at other times, it’s so nice to just have someone else do it for you! When I opened the box, it was kind of nice to be surprised at what our stylist (see? that sounds nice doesn’t it? haha) picked for us. We didn’t have to go anywhere and Ella was only too happy to oblige in trying on the clothes because she didn’t have to wait too long or get distracted by other things in a store. Look at her work it in the following photos! Ha!

Free shipping: Yassss, free shipping! If you don’t like some of the items, they give you a shipping bag and you just drop it off the nearest UPS and you’re good to go!

It’s not a subscription: You can get 1 box and 1 box only. It’s not a subscription where you have to do it monthly or else you have to cancel. You order a box when you feel the need for inspiration in clothing, and then when you don’t feel like it, you don’t have to! That’s pretty cool.

Are There Cons?

The only con I can really think of is that the $20 styling fee cannot be waived if you don’t purchase 2 or more items. So if you don’t like anything in the box at all, that’s $20 down the drain. But that’s the service you pay for. And honestly, I feel like there’s such a good variety in the box that you won’t have trouble picking 2 that you like.

My Verdict

This is definitely worth a shot. I mean, like I said, with the sign up bonus credit of $20, and the $20 styling fee getting waived (if you pick more than 2 items), it’s a great deal! You can also earn more credit if you get you refer a friend! So really, the first box is such a great deal, who wouldn’t want to try it?

If you do decide to try Mac & Mia, click here to get that first $20 credit! Yes, with that link, I get credit too. But even if I didn’t, I’d still tell you to try at least the first box because of the great deal! You’re stylist will be Lisa and she’s pretty awesome if I do say so myself! She’s very responsive to questions and believe me, I asked many questions! Gimme a break! I’m new at this!

If you do give it a try, let me know how you liked your first box!

And as always, thanks for reading and have an awesome rest of the day!


(all gifs are from giphy.com)

Things I Wish I Knew About Pregnancy/Post Pregnancy

Before I got pregnant with my first child, I think I had tunnel vision on what it was going to be like – during pregnancy and after. I read snippets of books and blogs about the miracle of birth and how the first time you hold your child, he or she would be the most precious thing you’ve ever set your eyes on.  No one told me about some of the not-so-wonderful part of it all.

Don’t get me wrong. Being a mother has been such a great experience for me and I would not trade it for anything else. I just wish I knew about everything else that came along with the pregnancy and right after it, so I wasn’t so much “deer in headlights” and overwhelmed with things I didn’t know would happen.

So here it goes. Pull up a chair and sit back and relax. This is gonna be a long one!

During Pregnancy

During pregnancy, it’s expected that your stomach will get larger and maybe even your breasts. But ladies, like for real, there are other changes that can happen. Everyone is different of course, so this may not happen to you. So just consider these fair warnings.

Swollen legs and feet – when I got pregnant for the first time, I was a practicing physical therapist in an outpatient orthopedic clinic. I was on my feet all the time but at the end of the day, I would stand in one place to do my paperwork. My circulation wasn’t great to begin with, so my legs and feet were huge by the time I went home – I mean major cankles ladies!
Don’t worry: I found that walking around helped to increase circulation which helped bring fluids back to the heart and decrease swelling. I also found that drinking a ton of water helped to decrease swelling. I know that sounds weird, but drinking water will flush out your body and decrease fluid retention – yes girl, you will pee a lot! It’s ok though! It’s a good thing!

Back, Hip, and Pelvic Pain – to account for a growing belly, ligaments tend to loosen up in your pelvic area. This can cause you to have pain in the hips, pelvis, and low back.
Don’t worry: Core and Kegel exercises helps increase support. It’s important to keep working on the muscles that are holding you together because your ligaments are like “bye felicia” at this time. So work on tightening the core and pelvic muscles to help give you extra support at this time.

Hemorrhoids – ok, so this is embarrassing but it has to be said. Sometimes, it happens ok? I am 5’1 and some change and my first baby weighed in at 9 lbs 11 oz when she was born. There was a lot of pressure down there while she was still in my belly. Couple that with the constipation that pregnancy can bring about (yay hormones, thanks you’re awesome….), hemorrhoids are sure to happen!
Don’t worry: eat foods with lots of fiber to help decrease constipation. Fair warning that that can bring about gas. So yeah, farting or swollen veins coming out of your anus? You pick. I picked farts. Also, if hemorrhoids do still occur as in my case, Preparation H helps with the itching and could help decrease the size of the hemorrhoids.

Emotional changes – as if women didn’t already have the monthly emotional changes to deal with when we are not pregnant, let’s just go ahead and make it unpredictable during pregnancy. Because why not?!
Don’t worry:  It really helps to surround yourself with people who can encourage you and be there for you during this time. Lean on them for support and they’ll help you get through the tough times. Oh and chocolates, lots and lots of chocolates!

After pregnancy

I don’t know about the other moms out there, but when Ella came out into the world, I was a little more drugged up than usual because I had to get a C-section (she would not come down the canal people!), so I wouldn’t say that I looked into her eyes and it was love at first sight. Here are some things I did not know could happen after the baby is born.

It Could Take A While to Feel Joy of Motherhood – is this bad that I’m writing this? Like legit, when I first saw Ella I was like “whose baby is that?” in my head. For some reason, I imagined a perfectly bathed newborn who was not swollen or red, thank you very much. Ella was swollen, and red, and hairy! Is that mean? Sorry, but for real, I was like “whoa.”
Don’t worry: some people don’t experience this at all and has the whole “love at first sight” type of thing. But don’t worry if you do experience this. Hormones plus drugs can make the brain and emotions get all wonky.  It’ll get better and you’ll be that mama bear in no time!

“Sleep Like A Baby” is a false statement – I don’t know what baby they were talking about in that saying, but not my baby. Nope. For the first week, every hour, you can be sure Ella was up. Then maybe every two hours for two weeks after that. The first month is pretty much a blur because there was no sleep involved. Cat naps maybe. But sleep? what is that?!
Don’t worry: After the first month, unless you have a colicky baby, you can get maybe 3-4 hour stretches at a time. Just keep going and hopefully their sleep duration will get longer and longer. By 6-8 months, both my kids were finally able to sleep 10-12 hours at night. So there’s a light at the end of the tunnel! You can do it!

Post “baby blues” is a real thing: yes, I knew that post-partum depression could be a real thing. The doctor defines that as no good days. But what if I had a good day every 2-3 days. They don’t necessarily count that as “depression.” But it’s real. If hormones were crazy before pregnancy, they’re even crazier after pregnancy. Couple that with no sleep, then it’s just the time of your life isn’t it.
Don’t worry: I think by Ella’s third month, my hormones finally settled and I was getting longer stretches of sleep. This is when I finally felt the “joy of motherhood” as they say.  Just hang in there ok? One, you got no choice, you got a baby. And two, with support from people who you trust and love, it’ll get better!

Bleeding Right After Pregnancy: I don’t know about others, but I kept bleeding for weeks after Ella was born. I’m talking like “oh yay my period is lasting like 4 weeks” type of bleeding.
Don’t worry: it’s normal. The doctor explained it in this way: I had 10 months of building up the lining in my uterus, so the body will take time to clear out that lining as well.  It’ll eventually stop and your period won’t come back for a while. Unless you’re like my friend whose period would still come monthly during and after pregnancy. No break for her.

Physical Changes: Ok so yeah, your boobs get real big… and hard. Like you need to pump that milk out because no joke, it hurts when it builds up. Not only that, but sometimes the ducts in your breasts can get clogged. And wooooooo it will huuuuurrrrtttt. There’s also a chance of mastitis, where your breast tissue gets inflamed and infected because of a clogged duct.
Don’t worry: If it’s not infected, massaging your breasts while breastfeeding or pumping will help unclog the duct. Heat compress and warm showers can also help. Frozen cabbage leaves right on the boobies can help decrease inflammation and engorgement. But ummm, you will smell like cabbages. Just wanted to warn you. Do you want engorged boobies or smell like a cabbage? Slap that cabbage right on there! Ok be gentle, cuz it hurts!
If infected, you’ll have to probably get antibiotics to help get rid of the infection. But it works real fast so you’ll feel better within a day or two.

More physical changes: The shape of your breasts/nipples may also change. I mean let’s be real, if it’s getting sucked on/pumped every hour of every day, yeah it’s gonna change! And it may hurt! I saw my friend breastfeed her baby and no lie there was a small piece missing from her nipple. No joke. Ouch.
Don’t worry: They have creams for your nips to help decrease chaffing and pain.

Even more physical changes: My feet got half a size bigger. I don’t know if my swelling just never went down or what, but my feet definitely is a half size bigger after Ella.
Don’t worry: Shoe shopping heeeyyyyyy!! After all that, you deserve it mama! Have. At. It!

So there is it folks! Just wanted to make sure you were well-read on what could happen during and after pregnancy. Again, everyone is different, so you may not experience any of these. If so, good for you! If not, just wanted to let you know that it’s ok! You’re not alone! Surround yourself with good, supportive family and friends. I promise that will help the most during the tough times.

And lastly, please don’t take this article the wrong way. I love my babies! They are my life. But pregnancy is just not for me and just thought I’d share some of my experiences to let you know it’s ok! You’re not alone! And to hang in there, because you will get through the tough times.

Thanks for reading and have an awesome rest of the day!

(All GIFs from this page are from giphy.com)